Configure Reaper for Voiceover and Audiobooks
Like most Digital Audio Workstations (DAWs), by default, Reaper is configured to produce music. It can be configured for voiceover by following the steps outlined below:
File Management
Reaper creates many files during the course of a session. Let’s set it up so they save with sensible names and in logical locations.
Media Files Folder
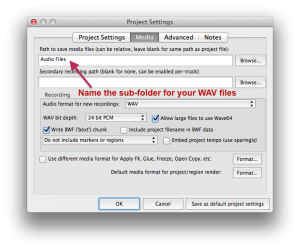 Open File > Project Settings and change to the Media Tab. Under “Path to save media files” enter whatever value you like. I entered “Audio Files”. Then, click “Save as default project settings”.
 ReaPeaks and Unsaved Project Folders
Reaper creates .reapeaks files to keep track of the waveforms that it has drawn to your screen. Their presence speeds up the Reaper interface, but these files are not necessary to your project. If they are needed and don’t exist, Reaper will simply regenerate them. So, grouping them all together is a good next step.
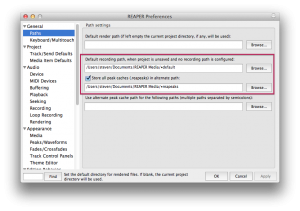
Open Preferences, and go to General > Paths. Check “Store all peak caches (.reapeaks) in alternate path” and fill in a value of your choosing. While you are on this screen, you might also want to define a “Default recording path” so audio that is not yet associated with a project has a place to live as well.
 File Names
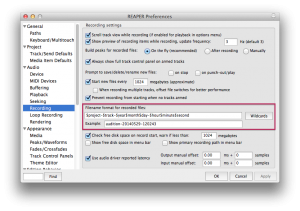
Though you won’t often need to deal with the individual WAV files directly, it is a good idea to give them a naming convention that makes sense to you. Open Preferences and go to Audio > Recording. Click on “Wildcards” and build your own file naming convention. I went with a basic timestamp.
 Project Templates and Backups
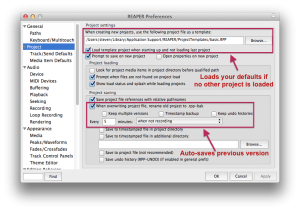
Though we aren’t up to saving templates yet, they happen to be on the same screen as backup management. So, open Preferences and click on Project. Note that you can have Reaper load a project template of your choosing when it isn’t loading any other projects. And, that you can tell Reaper to auto-save at the interval of your choosing and keep its previous project file as a backup. I have mine set to save every 5 minutes but only when not recording. If you’d like a more advanced backup configuration. Watch the video below.
Extensions
No Reaper installation is complete without adding the SWS/S&M Extension. This extension has so many features, that it would be nearly impossible for me to list them all here. So, trust me on this one. Download it. And, install it.
 Layout and Workflow
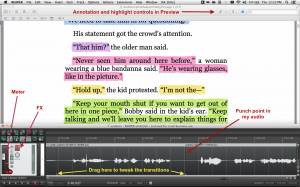
I work from a single screen while in the booth. So, I like my DAW to take up as little screen real estate as possible. I usually get scripts in PDF format, and Apple’s built-in Preview application allows me to annotate PDFs to my heart’s content. (If I were on Windows, I would use the free FoxIt Reader for similar functionality.)
Reaper is configured to be a strip along the bottom of my screen and is showing all of the tools that I need while I record. Also, note that the punch-points can be easily tweaked after the fact (marked in yellow). This is a real editing time saver.
 Tape Mode
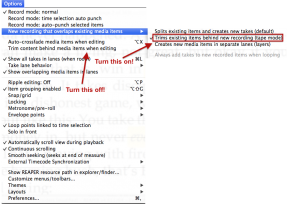
First, you will want to enable Tape Mode. Go to Options, find the setting that says “New recording that overlaps existing media” and set it to “Trims existing items behind new recording”. Next turn off “Trim contents behind media items when editing.” And, please leave Record mode set to “normal”. Reaper’s auto-punch selected items is not what us audiobook narrators mean when we talk about Punch & Roll.
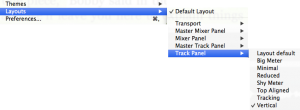
Next, further down on the Options menu, you will find Layouts. Set Transport to Small, and set Track Panel to Vertical. These settings help minimize the amount of space Reaper uses.
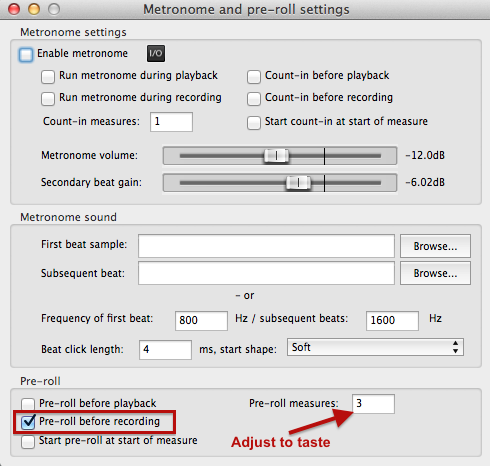
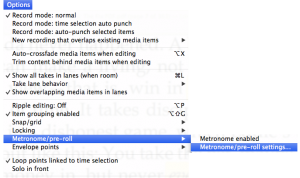 Also on the Options menu, find the Metronome/pre-roll settings. Once you open these settings, disable the metronome, set Pre-roll to Pre-roll before recording, and adjust the number of measures (my personal preference is 3).
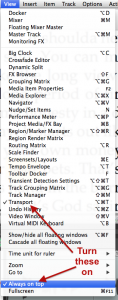 On the View menu, I have only 2 things enabled, Transport and Always on top. My goal is to get all of Reaper’s needed functionality while giving as much of my display as possible to showing the manuscript. I have learned the key commands to quickly hide/show anything else that I may need. Other people leverage the fact that Reaper also offers a tabbed interface option. But, the tabs take up space, and again, my goal is to simplify what I am seeing so its all about the audiobook.
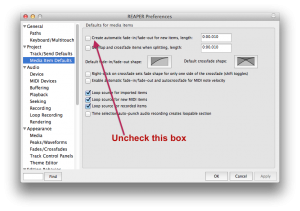 Back on the Project preferences, open Media Item Defaults and Uncheck Create automatic Fade-in/fade-out for new items. Leaving this checked would blend your old bad takes with your new ones, which is not the effect we’re looking for.
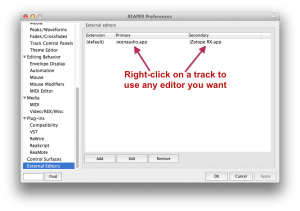 Next, go to the External Editors preference. Here, you get to choose 2 programs that you would like to be able to access by right-clicking on a take. I suggest that you include whatever your previous editor was (so soften your learning curve while you wrap your head around Reaper), and Izotope RX if you own it. Anything edited by an external editor becomes a new take in Reaper, which can be a lot faster than exporting/importing files between programs.
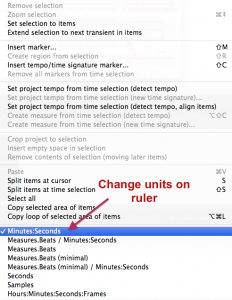 Minutes/Seconds instead of Beats/Measures
Like most DAWs, Reaper thinks in Beats and Measures by default. But, we can change that. In the main reaper window, right click on the ruler at the top to reveal these settings. Here, please select Minutes:Seconds.
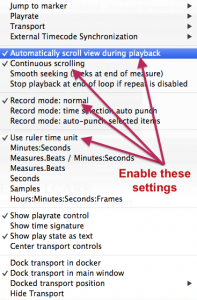 Now, right-click on the time displayed in the Transport Bar at the bottom of your Reaper window. Enabling the first two selections shown will keep the playhead in the center of the window. The third selection sets Record mode to Normal (not auto-punch). And the last, makes the Transport Bar use the same units as the ruler (above).
Start Recording!
So, now that all of that is done. Open a test project in Reaper, create and arm your track, and start playing around. Record a few minutes of audio and make a flub. Drop your playhead before the flub and hit record. You will see that the old take is layered under the new take. After dropping you playhead for a punch-in, try hitting the Z key (that will move the cursor to the next Zero-Crossing point (preventing clicks during edits).
Play with the transitions, tweak some more of the settings. Once you are satisfied, remember to save this project as a template (see above), so you can use it as a starting point for the future.
Do you use Reaper for Voiceover? Is there a setting that you find helpful? Please share it below.
Cup of Coffee
A ridiculous amount of caffeine was consumed while researching.
Add some fuel if you would like to help keep me going!
Click here to give whatever amount works for you and thank you 🙂

