Setting your own Recording Levels: A step-by-step guide for Audiobook Narrators & Voiceover Artists
Something has changed. You bought a new mic? A new pre-amp? You added some new sound treatment? Or, your set-up is the same, but the room its in is different? Any variation in your recording space means that you really should go through all of your settings again. Don’t be afraid. There is no reason to be overwhelmed.
If you take it step-by-step, it’s really not that difficult to do.
For our example, let’s assume that your next project is an audiobook that you are working on via the Audiobook Creation eXchange (ACX). ACX has very specific guidelines for file submission:
- Peak at or below -3dB
- Have an Average RMS between -23dB and -18dB
- Have a noise floor at or below -60dB
And, for today’s text, let’s choose something with lots of sibilant and popping sounds… How about the theme to Gilligan’s Island? It’s a great practice text since it has most of the offending sounds (S, P, T, etc), and it’s kind of fun to say.
1. Find the “sweet spot”
What we are really looking for is The Goldilocks Zone — not too hot, not too cold, not too hard not too soft. You want it to be “just right!” Unfortunately, “just right” is a subjective thing. So, let me give you a good starting point.
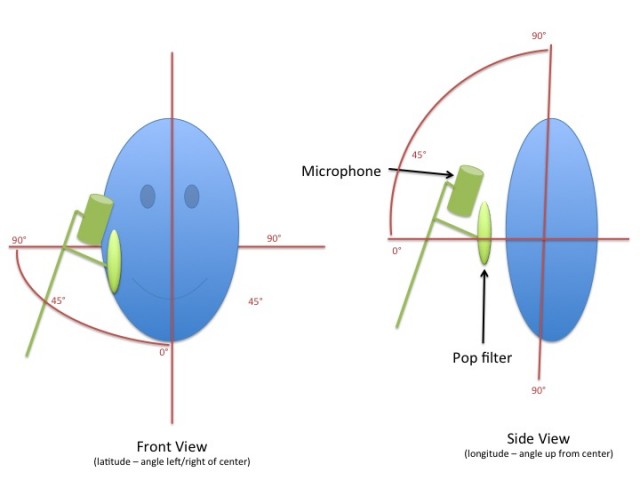
Think of your head as a globe. With your nose as longitude 0°, latitude 0°, move your mic to 45° north (up) and 45° east or west (right or left).

Set it 7 inches away from you and point it at your mouth (or slightly down toward your chest for a bit more resonance – but be careful with that).
Using that as a starting point, shift the mic slightly north, south, east, and west until you feel that you have found the truest sound. Currently, my microphone is about 37° to the right of my nose and about 40° up from the level of my nose.
Place your hand in front of your mouth and start reciting “Peter Piper picked a peck of pickled peppers,” over-and-over again. As you do this, move your hand away from your mouth. Odds are, you will stop feeling the rush of air at about 7 inches. And, the point of offsetting your microphone like this is not only to eliminate plosives, but other stray noises as well.
Even with good mic placement, it is still a good idea to use a pop filter. After all, no one’s perfect. People will pop from time to time. Good mic placement reduces the amount of work that you are expecting the filter to handle. When you add the pop filter, be sure to leave space between the filter and the capsule of your microphone. And, do not make it parallel with the capsule of the mic either. Parallel surfaces of any kind increase the possible sources of noise.
Make a quick recording of yourself and ask someone else, “Does this sound like me?” (Do not ask, “Does this sound good/deep/cool/etc?”)
2. Find your level
 Starting at 50% gain, adjust your volume while watching a meter. You want to find a volume that allows you to really act. You don’t want to be set so loud that any kind of intensity sends your levels too high. Since, in this example, we are delivering an audiobook file to ACX, the highest level that we would want ever see on that meter is -3dB. Odds are, you will wind up with peaks quite a bit lower than that, at -9dB or -12dB.
Now reduce any ambient noise in your recording space before measuring your noise floor. Our goal is to get a noise floor at or below -60dB. If you can’t achieve that, do your best to get a number as low as possible.
Remember, we are dealing with negative numbers here. So -60 is actually lower than -40.
Between -59dB and -50dB is pretty good, between -51dB and -45dB is okay, and between -44dB and -40dB is acceptable. The higher the number at this point (the closer it is to zero), the more work you will need to do in post-production to fix your audio.
3. Consider an Input Limiter
 If the software that you record in has this feature, consider adding a Limiter to your Input FX Chain. Input FX exist between your microphone and the recorded track. They are applied before the recording is saved. Once they are applied, they cannot be undone. The goal of the Limiter in this case it to catch an accidental spikes in your volume.
If, after setting your levels, you are finding that the bulk of your dialog is hovering around -9dB, try that Input Limiter set with both a Ceiling and a Threshold of -6dB. This still allows you a 3 decibel change for excitement but keeps the potential range of volume in check.
4. High and Low Pass Filters
 Set a High Pass Filter to 80 Hz and a Low Pass Filter to 16000 Hz. When ACX processes your audiobook, they strip out these frequencies anyway, so you don’t need them. Listen to a segment of room noise through this filter. Odds are you’ve dropped a few decibels. Lots of machines in your home emit very low rumbles below 80 Hz (your furnace, AC, refrigerator, washer, dryer, etc).
If your noise floor is below -60dB now, you may be able to skip steps 5.
5. Consider an Expander
 An Expander makes quiet things get quieter. So, make note of your original noise floor before step 4. Set the Expander’s threshold a just a bit above that number. And set its ratio to 2.1:1 as a good starting point.
If you don’t have an Expander, avoid using a Gate if possible. Gates are not as gentle as Expanders and are much easier to detect in spoken word recordings where there is no background music to help hide the edit.
6. Do you still need to remove noises?
If room noise is still an issue for you at this point, you need to consider changes to your space. Sound treating materials or even a vocal booth may be the real long term solution.
Take a look at my series of articles on solving that exact problem.
 This is the point in the process for Noise Removal Tools and DeClick/DeCracklers if you need them. You have removed all of the extraneous noises from your audio. So, a Noise Removal Tool can focus on just the true problem sounds. That way, you can use it with to the lowest possible settings. This will have the lowest possibility of introducing sonic artifacts (odd/unnatural sounding spaces in the audio). The same holds true for tools that attenuate mouth noises.
If your noise removal tool allows you to submit a sample of the room noise, record a good 30 seconds to a minute of how your room sounds without you speaking. Save it as a noise profile. Remember, the goal here is to reduce the ambient sound of your room to below -60dB, not to remove it entirely. So, adjust your settings accordingly.
Mouth noises are best addressed with non-technical solutions in your mouth, not on the recorded audio file. The interesting thing is that most of the “folk remedies” (green apples, water with lemon, black tea, neti pots, saline nasal sprays, etc) do seem to actually work. In addition to the lubricating qualities of these remedies, they also serve to make you more conscious of the problem. That consciousness is key in developing the skill to eliminate the problem on your own.
Most tools that we use to reduce mouth noises were not actually designed for use on the human voice. For the most part, they were designed to remove clicks, crackles, and pops from old vinyl phonograph recordings. Keeping that in mind may help you understand how the tools affect your recordings.
Again, the goal is to reduce, not eliminate, sounds. Silence rooms are unnatural. Human beings breathe, and breathing is a sloppy business. Natural recordings are easier to listen to for long periods of time. And, an audiobook is a long form interaction with your audience. You want to be as natural as possible.
7. Maybe add a bit of Compression
 Find a transparent compressor set at 2.1:1 at most. In this context, transparent means that it doesn’t add any of its own flavor to the audio. Set the threshold a few dB under your peak. This will tighten up your audio without giving it that BIG RADIO sound.
8. Get Equalized?
 Most people get a bit too heavy handed when given an equalizer. For most voiceover, you want to keep it as natural as possible. I recommend using an EQ with fewer controls (like a tilt EQ). This will help you learn to use a light touch (since small changes will impact the whole spectrum).
9. De-Ess (but only if you really need to)
 If you feel that you are just too sibilant, this is the point in your chain when you should run a De-Esser. Essentially, a De-Esser is a compressor designed to squish S-like sounds. Over doing it can make you sound like you are lisping. So, once you think it sounds good, its best for you to run it by someone else before permanently saving the settings.
Q: But wait! Since the De-Esser is a kind of Compressor, shouldn’t it go right after the regular Compressor? Or maybe before the Compressor to squish those S’s beforehand?
A: Those are all good thoughts. And, on your particular voice (with your particular software) you may be right. Try it at this point in the chain first. Because this is the place that you will really hear those S’s pop if they are actually a problem. Once you have a setting that you like, move it around in the chain of things. Find what sounds best to you.
If you do add a De-Esser to your chain, I strongly suggest that you find a vocal coach to help you address the problem at its source.
10. Add another Limiter
 Configure a hard limiter with a Ceiling of -3dB and bring down your threshold so it is near the output level from your equalizer. You are not trying to force all of the peaks up to -3dB. You are just trying to guarantee that the peaks will never exceed -3dB. What you really care about is being as close to -20dB for your Average RMS. The further you bring down that threshold, the louder the final recording will seem. Since RMS measures perceived loudness, a file with peaks of -3dB with an average RMS of -23dB will seem quieter than a file that peaks at -5dB with an average RMS of -20dB.
Q: But isn’t a Hard Limiter a kind of Compressor? Do I really need up to 4 Compressors to get the job done?
A: Yes, a Hard Limiter is a kind of Compressor. We are using each of the 4 Compressors differently: the first one keeps you from spiking your input level, the second tightens up your mix, the third reduces sibilance, and this one makes your sound louder without changing its shape or texture. You could turn off all of the other compressors and just keep this one if all you need to do is bring up your volume. Compare how your audio sounds with each compressor turned on and off. Decide for yourself what sounds best.
11. Save Everything
 No, seriously. Stop right here and save everything! Go into each plugin, effect, and app and make sure that you save all of your presets. Use a unique name like “Audiobook Settings – 29 January 2015“. Please consider adding dates to your settings files. It is very helpful if you are ever asked to match the sound you had on a previous project.
12. Measure and tape your space
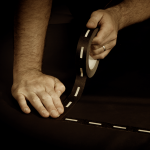
 Grab a ruler and some masking tape. Use them to measure and mark the distance between your desk, chair, mic stand, and anything else that is in the booth. If you are using a boom arm, use tape to mark how extended you have each section. You’ve just done a lot of work that is dependent upon you maintaining a consistent distance between all of your components. You should never put yourself in a position where you don’t know if something moved. Save yourself worry later, take the measurements now.
Some Quick Notes
For my example, I used plugins with very simple interfaces. I did that so you could easily see what each plugin is doing. Many of the plugins I chose were simplified versions of plugins that can be found at Stillwell Audio. They make some wonderful plugins at a fair price. You should really check them out.
The Stillwell plugins used in this example include Event Horizon (Limiter) and Major Tom (Compressor). While you’re there check out 1973 (EQ). I think you’re going to like that one too.
The Noise Removal tool above is part of Acon Digital’s Restoration Suite. The suite includes a DeNoise, DeClick, DeHum, and a DeClip tool. (See my article detailing it here.)
The Tilt EQ I used in this example is the Niveau Filter by Elysia. While not formally labelled as an Equalizer, as you can see in the video below, it does affect audio in a similar way. It is a free download and should work with just about every program that can use plugins.
Also, please note that I avoided discussing things that would apply only to a particular DAW or recording program. The only feature that may not exist in the program that you are using is Input FX. While incredibly helpful, Input FX are not absolutely necessary to get the job done.
Cup of Coffee
A ridiculous amount of caffeine was consumed while researching.
Add some fuel if you would like to help keep me going!
Click here to give whatever amount works for you and thank you 🙂

