I finally bought a Vocal Booth! – Part 3
In Part 1 of this series, I went through the questions that anyone should ask themselves to see if their sound issues can be handled without the expense of a Vocal Isolation Booth. In Part 2, I went through some questions that anyone should consider if they have decided that they do indeed need a booth. And, I went on to detail some vendors that you might consider.
Now, in Part 3, after much research and consideration, I decided that I will buy my Vocal Isolation Booth from Barcelona, Spain-based StudioBricks. Why StudioBricks?
The audio in that video above says a lot. StudioBricks delivers a solid booth at a reasonable price.
Before shipping, (as of March 1, 2014) the StudioBricks One costs $2545 less than an a WhisperRoom of comparable size and strength (4’x4′ enhanced). And, where the big American companies (GretchKen, WhisperRoom, and VocalBooth.com) use standard acoustical foam, StudioBricks uses products from a Portuguese company called Vicoustic, that give their booths a much more pleasingly finished aesthetic. Since I am planning on spending many hours a day inside the booth, how it looks and feels is important to me.
As you can see from this video (and reviews like these from Paul Strikwerda), StudioBricks booths are already making waves throughout the greater Voice Over community. They are proving that a quality product does not need to be prohibitively expensive.
 As you may remember from Part 2 of this series, my booth needs to be able handle a low ceiling issue. And, I liked StudioBricks’ solution the best. Since their design is built from smaller, easy-to-handle, solid wood sections that have been precision cut, they were able to offer me a single booth that could be assembled at two different heights. Those smaller pieces also mean that StudioBricks booths should be easier to get through narrow entryways or around odd corners (common here in old New England homes).
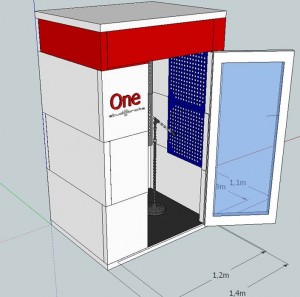
Guillermo Jungbauer of StudioBricks made the ordering process easy. Early on, he emailed mock ups of the design to help explain my customization. Then, we discussed the details over Skype. He then invoiced me for 30% of the total cost and got to work building the booth. Over this last weekend, 3 days ahead of schedule, Guillermo sent me some photos of the finished, assembled, and tested booth. Once the booth is packed and ready to be shipped, Guillermo will send me all of the shipping details. Once I am satisfied that the booth is loaded on the ship and ready to head for the USA, that is when I pay the remaining 70% of my bill.
Paying part up front, and the rest when ready for shipment feels a lot better than laying out all the money up front. After some horror stories that I have heard about dealing with some smaller vendors (that might become a future blog entry once I collect enough data), paying only 30% up front made me a lot more comfortable with making the purchase.
Over the next few weeks, I will be tracking my booth as it makes its way from the workshop in Barcelona, Spain to my home in Western Massachusetts, USA. During that time, I will be checking in with others who already own StudioBricks booths, looking for insight, tips, etc. Some people says that the booths require extra sound treatment (most often bass traps), but the feedback on that is far from unanimous.
I can’t wait to slot the whole booth together and get to work. StudioBricks seems like it will be a major upgrade to my current workspace. No more cramped, over-insulated, under-ventilated closets for me!
☕ Cup of Coffee
A ridiculous amount of caffeine was consumed while researching.
Add some fuel if you would like to help keep me going!
☕ $5 ☕ $10 ☕ $15 ☕ $20 ☕ $25 ☕ $50
Related articles
Part 1 – Do I really need a vocal booth?
Part 2 – Yes I really need a vocal booth!
Part 4 – I bought the new StudioBricks One Plus!

